Introduction
Authentication and authorization are often considered the dirtiest parts of an application—yet they are among the most crucial. The complexity of handling multiple identity providers, token lifecycles, and security risks makes it a challenging but unavoidable aspect of software development. In this blog, we will explore how to implement multiple authentication schemes in ASP.NET Core while keeping the code maintainable and secure.
The whole content is based on my latest YouTube video, you can watch it here:

The Core Concept
Before diving into implementation, let's clarify the distinction between authentication and authorization:
Authentication:Determines whether a user is who they claim to be by validating credentials or tokens. If token isn’t valid then throw Unauthorized (401)Authorization:Determines what resources an authenticated user is allowed to access. If user doesn’t have access then throw Forbidden (403).Authentication Scheme:The process of decision which handler should do the authentication. Has two parts:- An authentication handler
- Options to configure how to validate token
The Process of a request
These are the steps to validate a incoming request to our application:
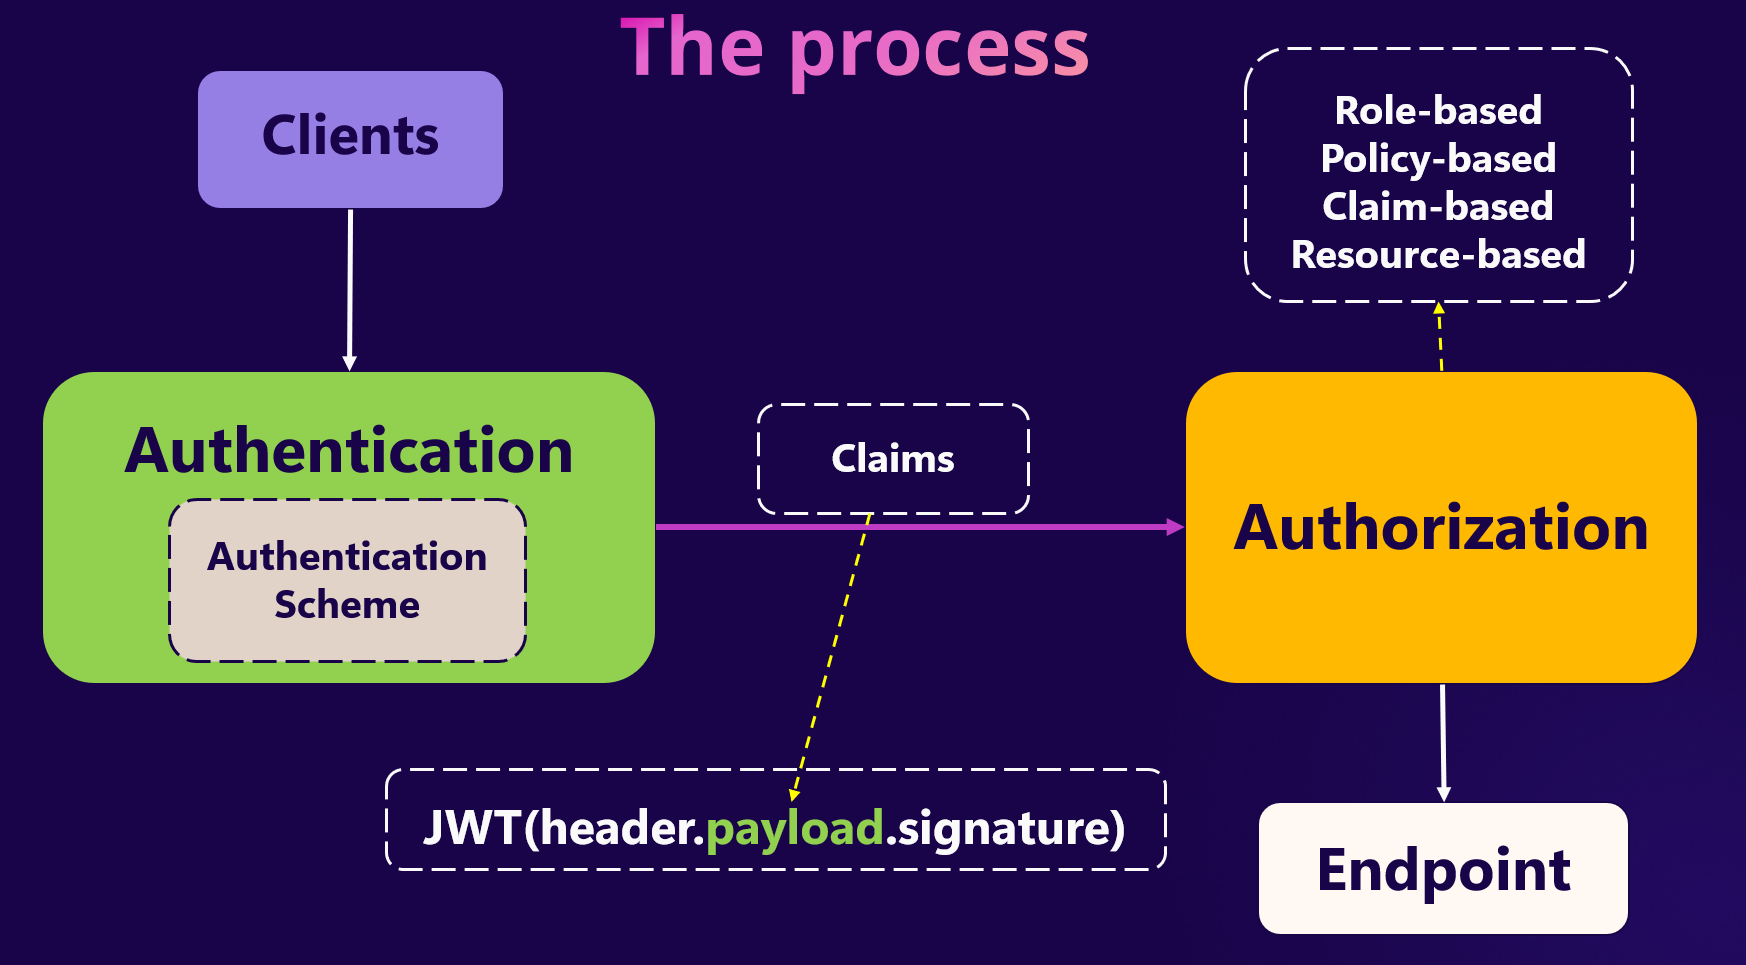
Authentication by getting help of Scheme will validate the token (assume a JWT) if wasn't valid then will return back to the client with 401 status code but everything passed then request goes to the next step which Authorization. Now, we need to make a decision based on the claims inside the token, there are few ways for doing the Authorization like Role-based, Policy-based or a custom way, if request doesn't have required claim then application will return 403 status code as forbidden, otherwise request will reach the resource (our API).
Authentication and Authorization are 2 middlewares in ASP.NET Core pipeline and will execute after each other.
A Real Scenario
Imagine a scenario where we need to support:
Azure B2Cfor end-user authentication.Oktafor enterprise users.Custom APIkeys for backend-to-backend communication.
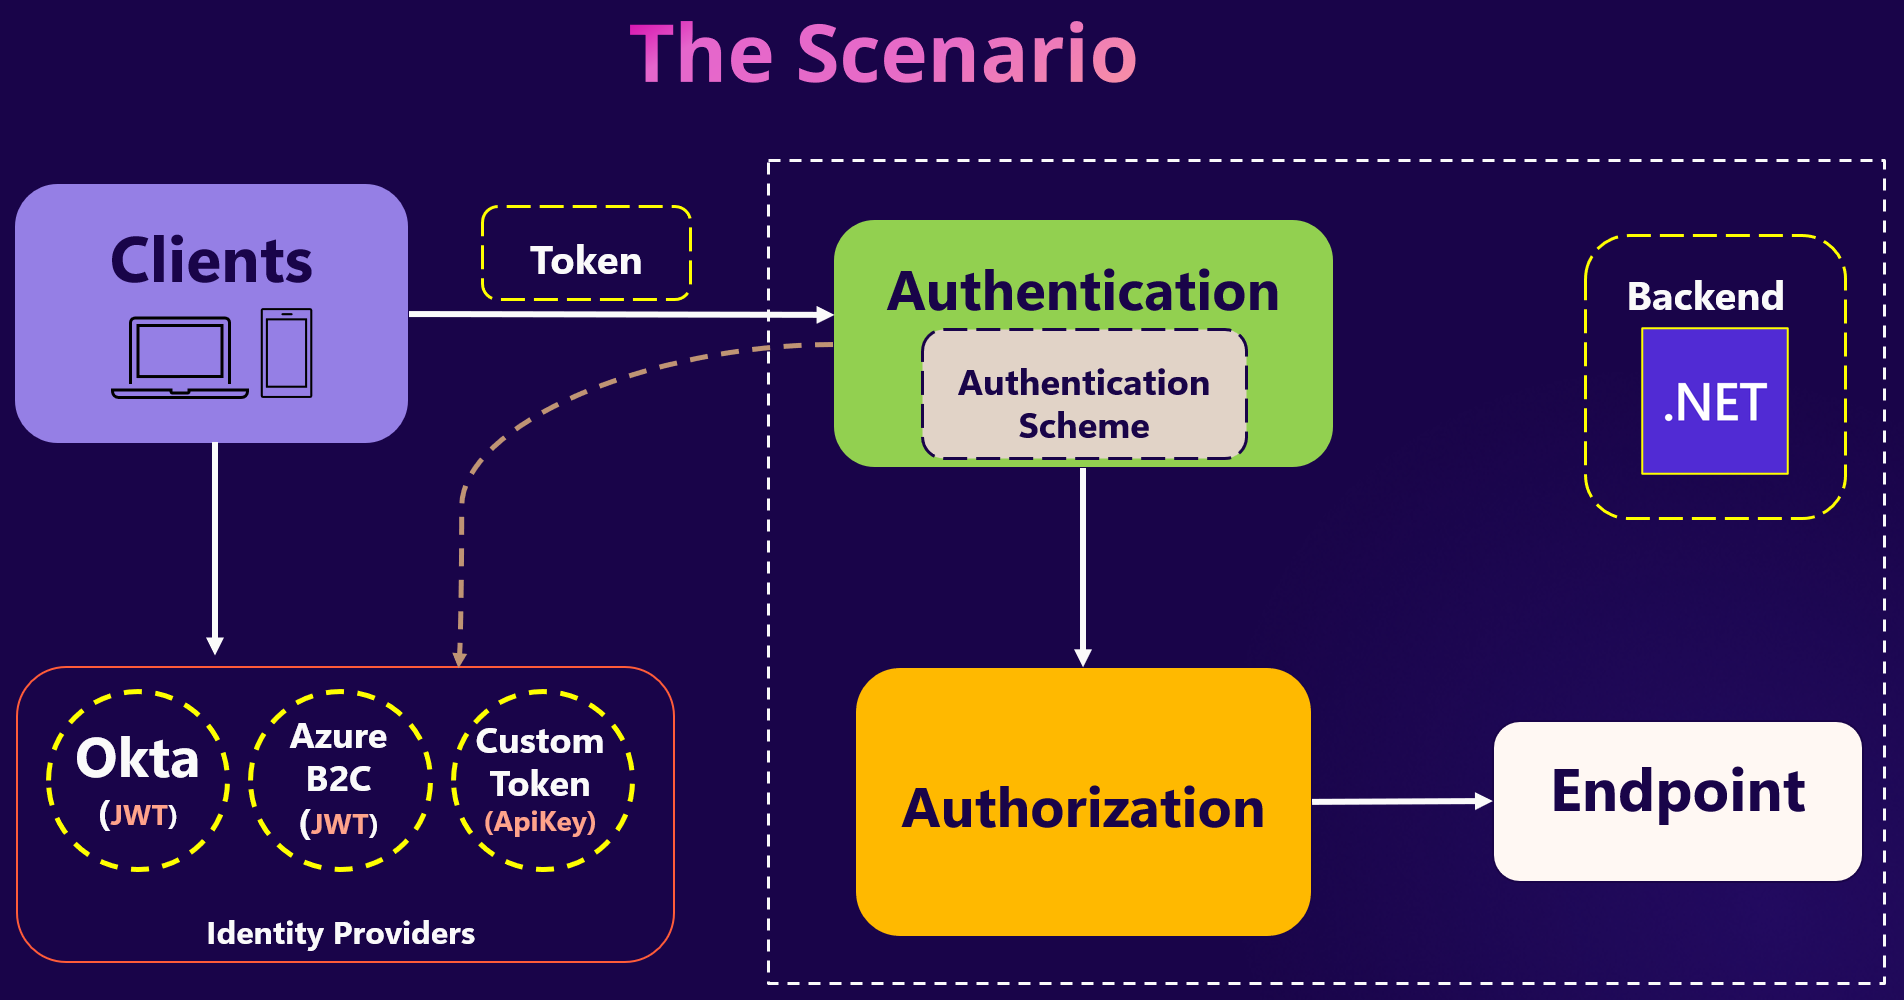
By having only one Identity provider, everyone is happy and everything works as expected but when it comes to have multiple it becomes a little scary:) but it's easy!
First Identity Provider
As we saw in the scenario image, first and second token are in JWT format (header.payload.signature). So to validate a JWT we need to add one nuget package to the project:
Microsoft.AspNetCore.Authentication.JwtBearer
Here is the piece of code to validate Azure B2C token:
services.AddAuthentication(options =>
{
    options.DefaultAuthenticateScheme = JwtBearerDefaults.AuthenticationScheme;
    options.DefaultChallengeScheme = JwtBearerDefaults.AuthenticationScheme;
})
 //AzureB2C, the Scheme name is JwtBearerDefaults.AuthenticationScheme (Bearer)
 .AddJwtBearer(options =>
 {
     options.TokenValidationParameters = new TokenValidationParameters
     {
         ValidIssuer = config["jwt-issuer-azure-b2c"],
         ValidAudience = config["audience-azure-b2c"],
         ClockSkew = TimeSpan.Zero,
         IssuerSigningKey = new SymmetricSecurityKey(Encoding.UTF8.GetBytes(config["jwt-key-azure-b2c_MustBeInASecurePlace!"]!))
     };
 })
Nothing special here, we used AddJwtBearer extension to validate JWT token and set the options about Azure B2C configuration. If you remember we said a Authentication Scheme has two parts: Handler and Options, here internally AddJwtBearer add a handler for us and we provide the options for it, which means we got a scheme!
Just one point about ClockSkew = TimeSpan.Zero, that's interesting to know the default value for ClockSkew is 5 mins! means if a token expired still is valid for 5 minutes and can call the API, because I'm not kind enough I set it to zero so that right after token expired the user has to relogin or refresh the token:).
Second Identity Provider
Same as the first one:
services.AddAuthentication(options =>
{
    //options
})
 //AzureB2C, the Scheme name is JwtBearerDefaults.AuthenticationScheme (Bearer)
 .AddJwtBearer(options =>
 {
     // options
 })
 //Okta, the Scheme name is Scheme_Okta
 .AddJwtBearer("Scheme_Okta", options =>
 {
     options.TokenValidationParameters = new TokenValidationParameters
     {
         ValidIssuer = config["jwt-issuer-okta"],
         ValidAudience = config["audience-okta"],
         ClockSkew = TimeSpan.Zero,
         IssuerSigningKey = new SymmetricSecurityKey(Encoding.UTF8.GetBytes(config["jwt-key-okta"]!))
     };
 })
As the Okta also is sending JWT token then we just did the same way as for the first one and got 2 schemes!
So far so good, we added two provider and they are easy as a result of having JWT token but how about the third one since it's not JWT and just an API key like a guid value?? We know what to do!
Custom Authentication Handler
public class CustomAuthenticationHandler : AuthenticationHandler<CustomAuthSchemeOptions>
{
    private readonly ITokenService _tokenService;
    public CustomAuthenticationHandler(IOptionsMonitor<CustomAuthSchemeOptions> options,
        ILoggerFactory logger,
        UrlEncoder encoder,
        ITokenService tokenService) : base(options, logger, encoder)
    {
        _tokenService = tokenService;
    }

    protected override async Task<AuthenticateResult> HandleAuthenticateAsync()
    {
        if (!Request.Headers.TryGetValue("Authorization", out var customToken))
            return AuthenticateResult.Fail("No AccessToken");

        var dbToken = await _tokenService.GetAsync(customToken.ToString().GetAccessToken()!);

        if (dbToken is null)
            return AuthenticateResult.Fail("invalid token");

        var claims = new ClaimsIdentity(nameof(CustomAuthenticationHandler));
        // you can more claim based on authorization for example add Roles or Policies

        var ticket = new AuthenticationTicket(
                   new ClaimsPrincipal(claims), Scheme.Name);
        return AuthenticateResult.Success(ticket);
    }
}

public class CustomAuthSchemeOptions
   : AuthenticationSchemeOptions
{
}
There is built-in class in ASP.NET Core called AuthenticationHandler and has a method to override, for having a custom handler we just need to put our custom logic into HandleAuthenticateAsync.
Keep in mind this method will be called by pipeline at runtime when ASP.NET Core tries to do the authentication middleware. Also we need an options class as part the Scheme, here we don't have any new property!
Third Identity Provider
services.AddAuthentication(options =>
{
    //options
})
 //AzureB2C, the Scheme name is JwtBearerDefaults.AuthenticationScheme (Bearer)
 .AddJwtBearer(options =>
 {
     //options
 })
 //Okta, the Scheme name is Scheme_Okta
 .AddJwtBearer("Scheme_Okta", options =>
 {
    // options
 })
 //The scheme name is CustomToken
 .AddScheme<CustomAuthSchemeOptions, CustomAuthenticationHandler>("CustomToken", options =>
 {
     // no need to set any options because you will handle them in the handler implementation
 });
Nice!
As we have a custom handler we need to register the scheme explicitly by using AddScheme method, well actually the AddJwtBearer is doing that for us behind the scenes! now we've got 3 schemes! but WAIT!
Something is wrong!
If you call the API it doesn't work properly for Okta and custom api-key, you'll get 401!
The reason is all the requests will check by the first scheme!! and it makes sense because we set options.DefaultAuthenticateScheme = JwtBearerDefaults.AuthenticationScheme; and the first scheme name is JwtBearerDefaults.AuthenticationScheme by default, sorry I made on-purpose to tell another point!
So we can solve this issue in two ways:
- Set
AuthenticationSchemein theAuthorizeattribute like this:
[HttpGet("okta")]
[Authorize(Roles = "role-okta", AuthenticationSchemes = "Scheme_Okta")]
public IEnumerable<WeatherForecast> GetByOkta()
We're telling the ASP.NET Core runtime if you want to check token coming from Okta provider, please check it with the correct scheme and same goes for all other APIs for custom api-key.
As you guessed correctly, it's going to be a mess if we have to set scheme everytime we develop a new api and worse the code is really hard to maintain, so what to do? YES, AddPolicyScheme!
Using AddPolicyScheme, The best approach!
services.AddAuthentication(options =>
{
   options.DefaultAuthenticateScheme = JwtBearerDefaults.AuthenticationScheme;
   options.DefaultChallengeScheme = JwtBearerDefaults.AuthenticationScheme;
})
   .AddPolicyScheme(JwtBearerDefaults.AuthenticationScheme, JwtBearerDefaults.AuthenticationScheme, options =>
   {
       options.ForwardDefaultSelector = context =>
       {
           var jwtHandler = new JwtSecurityTokenHandler();
           var token = context.Request.Headers[HeaderNames.Authorization].ToString().GetAccessToken();
           if (!string.IsNullOrEmpty(token) && jwtHandler.CanReadToken(token))
           {
               var tokenIssuer = jwtHandler.ReadJwtToken(token).Issuer;

               if (tokenIssuer == config["jwt-issuer-azure-b2c"])
                   return "Scheme_AzureB2C";
               else
                   return "Scheme_Okta";
           }

           return "CustomToken";
       };
   })
 //AzureB2C, the Scheme name is Scheme_AzureB2C
 .AddJwtBearer("Scheme_AzureB2C", options =>
 {
     //options
 })

 //Okta, the Scheme name is Scheme_Okta
 .AddJwtBearer("Scheme_Okta", options =>
 {
     //options
 })
 //The scheme name is CustomToken
 .AddScheme<CustomAuthSchemeOptions, CustomAuthenticationHandler>("CustomToken", options =>
 {
 });
Actually the AddPolicyScheme came to solve this issue, when there are multiple authentication schemes we need to find a way to decide what scheme should used, so here I made a decision based on token issuer but you can it based on your logic! Now everything is clean, no?
I recommend to watch YouTube video, there I explained in detailed way. Here is the github repo for all these codes, please support by giving a ⭐ github
Thanks for reading!